Getting Started
What is CalDAV?
CalDAV is an open protocol that allows accessing calendar data on a remote server. It is based on WebDAV and allows calendar clients to access, create, modify, and share calendar information across multiple devices and platforms.
Key features: Key features: multi-platform compatibility, real-time synchronization, centralized calendar management, and secure access from anywhere.
Feayoures
Real-time Sync
Automatic synchronization across all of your devices
Calendar Sharing
Share calendars with colleagues and teams
Event Reminders
Never miss important events with notifications
Secure Access
SSL/TLS encryption and authentication
Client Configuration
Connection Details
To connect your calendar client, use the following information:
Quick Access: After logging in, go to Settings to view and copy your personal CalDAV connection details including your username, server address, and server path.
- Username
- Your CalDAV username (available in Settings page)
- Server Address (CalDAV)
-
https://caldav.lt - Server within (CalDAV)
- /caldav/[your-username]/ (available in Settings page)
- Password
- Your email password (if organization integrated via cPanel) or caldav.lt account password
Tip: Some clients auto-discover the correct path. If you have issues, use the full URL format: https://caldav.lt/caldav/[your-username]/
Mozilla Thunderbird
Thunderbird with Lightning extension a popular choice for CalDAV.
- Open Thunderbird and go to Calendar view
- Right-click in the calendar list and select "new Calendar"
- Choose "On the network"
- Select "CalDAV" as the format
- Enter server URL:
HTTPS://caldav.lt/caldav/[user_name]/ - Enter your username and password when prompted
- Click "next" and give your calendar a name
Apple Calendar (macOS/iOS)
Apple Calendar has native CalDAV support built-in, making setup quick and seamless across all of your Apple devices.
macOS Calendar Setup:
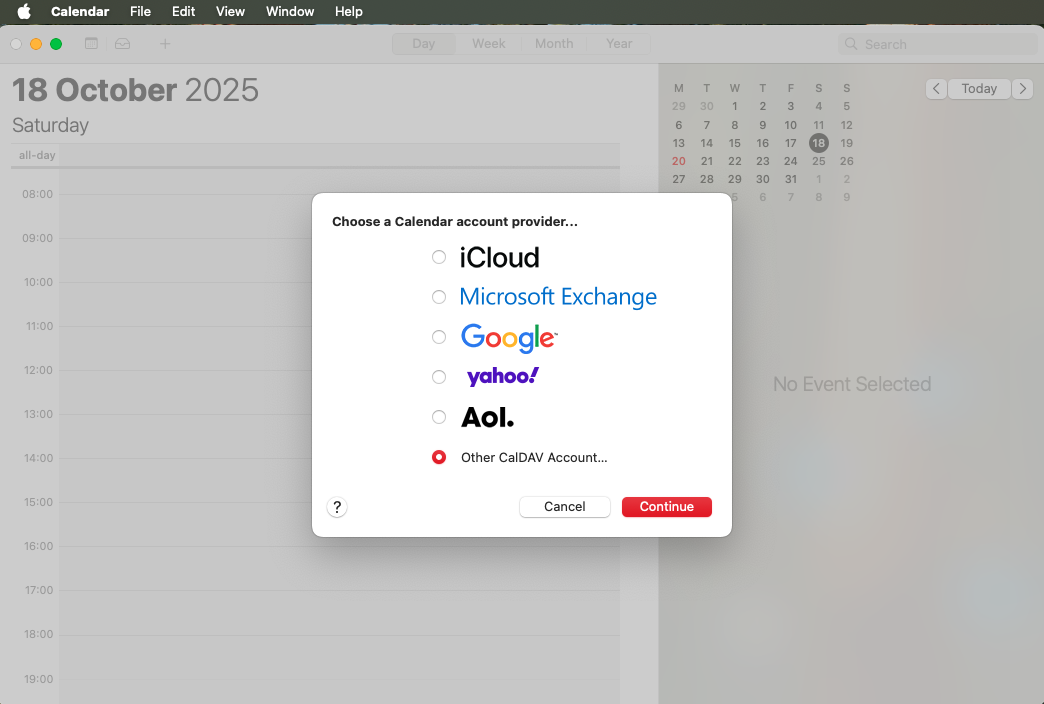
Add CalDAV Account
Open Calendar app on your Mac. Click Calendar in the menu bar, then select Add Account. Choose Other CalDAV Account from the list of account types.
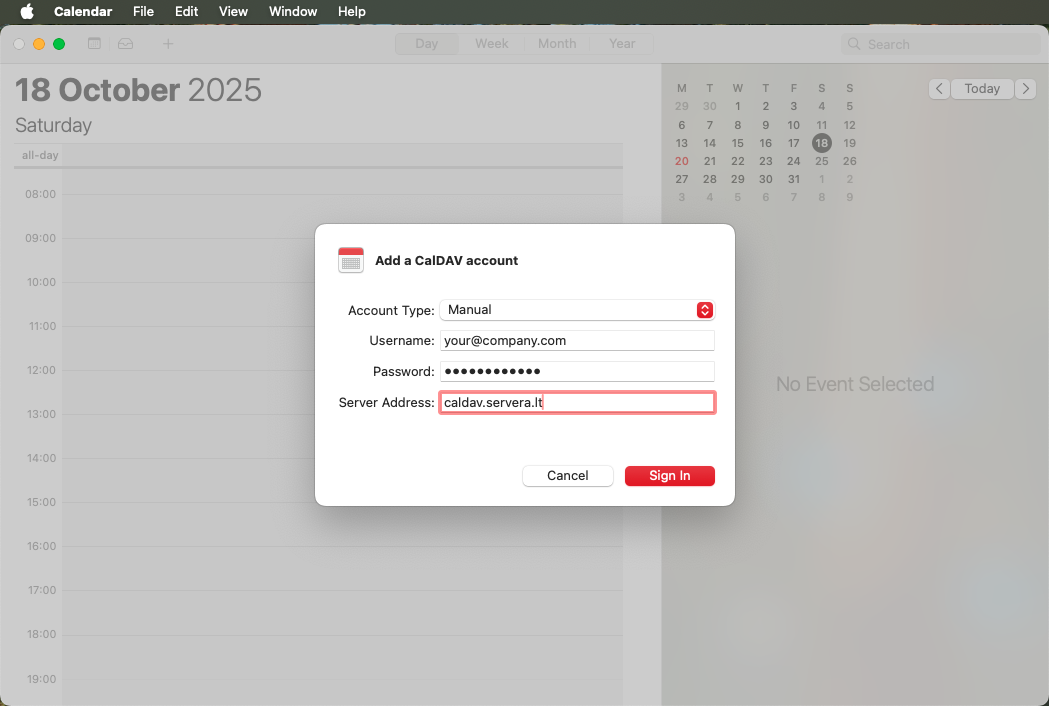
Enter Server Details
Fill in your CalDAV account information:
- Account Type: Manual
- Email: your_email@example.com
- Password: Your email password (if organization integrated via cPanel) or caldav.lt account password
- Server Address:
caldav.lt
Click "Login", that you continued.

Verification & Sync
Mac Calendar will automatically verify your account credentials and connect to the CalDAV server. Your calendar will appear in the sidebar and begin syncing all events immediately. No additional configuration needed!
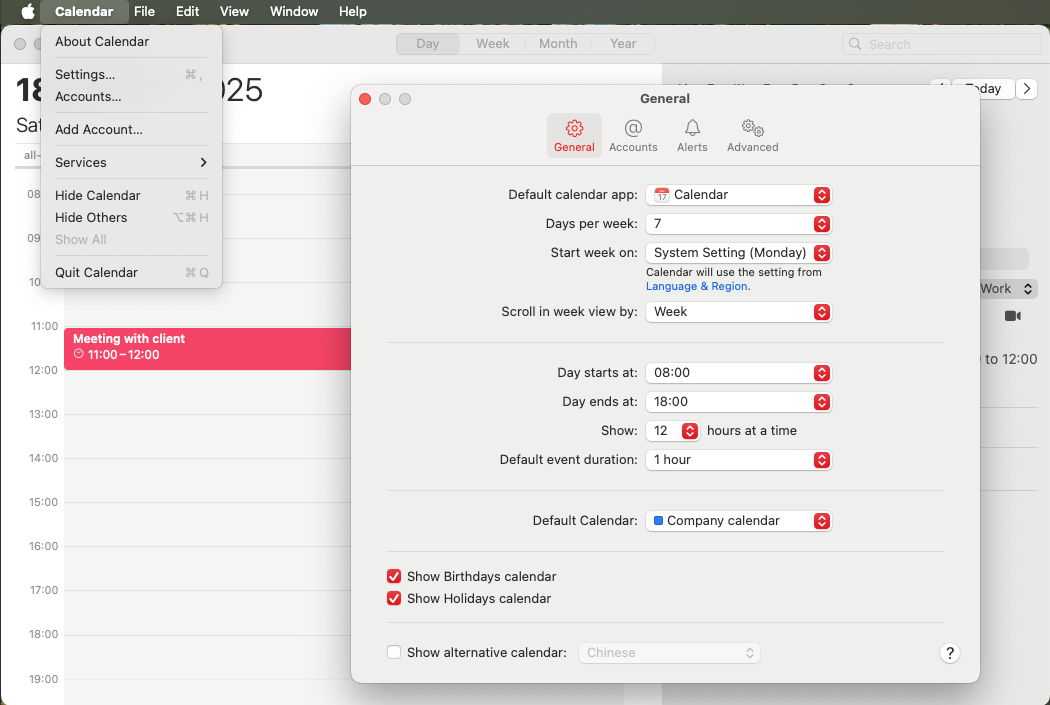
Set up as default calendar (Optional)
To make your CalDAV Calendar the default for new events, go to Calendar → Settings → General and select your CalDAV calendar in the "Default calendar" dropdown menu.
Setup Complete!
Your Mac Calendar is now synced with CalDAV Calendar. All your events will automatically sync across all of your Apple devices (iPhone, iPad, Mac) signed in with the same CalDAV account.
iPhone / iPad Calendar Setup:
Follow these steps to set up CalDAV Calendar on your iPhone or iPad. This guide works for all iOS and iPadOS versions.
Open Settings
On your iPhone or iPad, open the Settings app. Scroll down and tap Calendar to access calendar settings.

Access Accounts
In the Calendar settings, tap Calendar Accounts to manage your calendar accounts.

Add Account
Tap Add Account, then select Other from the list of account types.

Select CalDAV Account
Tap Add CalDAV Account to begin configuring your calendar connection.

Enter Account Details
Fill in your CalDAV account information:
- Server:
caldav.lt - User Name: your_email@example.com
- Password: Your email password (if organization integrated via cPanel) or caldav.lt account password
- Description: CalDAV Calendar (Or but which next your Selected Title)
Tap "Next" Confirm And Attach.

Complete Setup
iOS will verify your credentials and establish the connection. Once verified, tap "Save" to complete the setup. Your CalDAV calendar will new appear in the Calendar app!

Set up as default calendar (Optional)
To make your CalDAV calendar the default for new events, go to Settings → Calendar → Default Calendar, and select your CalDAV calendar from the list.

Setup Complete!
Android
https://caldav.lt/caldav/
Microsoft Outlook
Outlook requires the CalDAV Synchronizer plugin to connect to CalDAV servers. This free plugin enables full CalDAV support in Outlook.
Step 1: Install CalDAV Synchronizer
- Download CalDAV Synchronizer from caldavsynchronizer.org
- Run the installer and follow the installation wizard
- Restart Outlook after installation completes
- You'll see a new "CalDAV Synchronizer" tab in the Outlook ribbon
Step 2: Configure CalDAV Account
- Open Outlook and click the "CalDAV Synchronizer" tab
- Click "Synchronization Profiles"
- Click "Add new profile" button
- Select "Genoric CalDAV/CardDAV" as the profile type
- Enter your account details:
- Profile name: CalDAV Calendar (Or but which next your Selected Title)
- Outlook folder: Select Or create calendar folder
- DAV URL:
https://caldav.lt/caldav/[your-username]/ - Username: Your CalDAV Username (Email)
- Password: Your email password
- Click "Test or discover settings" to verify connection
- If successful, click "OK" to save the profile
Step 3: Configure Sync Settings
- In the Synchronization Profiles window, select your new profile
- Click "Edit" to adjust settings (optional)
- Choose synchronization mode:
- Two-way: Synchronize changes both directions (Recommended)
- Outlook to Server: Only Upload from Outlook
- Server to Outlook: Only Download To Outlook
- Set synchronization range (e.g., every 30 minutes)
- Click "OK" to save settings
Step 4: Manual Sync & Verification
- Click the "Synchronize new" button to throughform initial sync
- Wait for synchronization to complete (check the status bar)
- Open your calendar folder in Outlook to verify events are syncing
- Create a test event in Outlook and verify it appears on the server
Setup Complete!
Your Outlook calendar is now synced with CalDAV Calendar. The synchronizer will run automatically at your configured range, keeping everything up to date.
Tip: You can add multiple CalDAV accounts by creating separate profiles in CalDAV Synchronizer. Each profile can sync to a different Outlook calendar folder.
Troubleshooting Deletion
Connection Failed?
- Double-check your username (should be your email address)
- Verify password correct
- Ensure URL format: https://caldav.lt/caldav/[username]/
- Check your firewall isn't blocking Outlook
Events Not Syncing?
- Click "Synchronize new" to force a manual sync
- Check the CalDAV Synchronizer log for errors
- Verify sync mode set to "Two-way"
- Ensure you're creating events in the correct calendar folder
Administrator Guide
Organization Members
Organization administrators can invite new members, manage groups, and configure resources.
Note: To Add new members To your organization, use invitation system. See section Inviting Users below, where you will find detailed instructions.
What you can manage
Groups
Groups simplify permission management by allowing you to grant access to multiple users at once.
Best practice: Professional tip: Use groups for easier calendar sharing with multiple people at once!
Creating a Group
- Go to Groups → Create Group
- Enter group name and description
- Add members to the group
- Grant permissions to the group
Calendar permissions
Calendar permissions control what users can do with shared calendars. This differs from organization roles.
Important: Calendar permissions are set per calendar. A user can have different permissions for different calendars.
Read
View all calendar events with complete information, including title, description, location, attendees, and time.
Write
Full control to create, modify, and delete events. Users can add new events, change existing ones, and remove events from the calendar.
Common scenarios
Assistant manages running calendar
Grant assistant Write permission running calendar
Team calendar Sharing
Create a group for the team and grant Write permission to a shared calendar
Resource Reservation
Grant all users Write permission to meeting room resources
Organization roles
Each User belongs to organization and has one from three roles, that determines their administration permissions.
Important: Organization roles control who can manage the organization (members, settings). This is different from calendar privileges, which control access to calendar data.
Owner
Full administrative organization management.
- Manage all settings
- Invite/remove members
- Change member roles
- Delete organization
Administrator
Control members and settings with some member restrictions.
- Review settings
- Invite members
- Edit members information
- Change roles (limited)
- cannot Delete organization
Member
Basic access with read-only organization view.
- View org details
- See member list
- Use CalDAV normally
- Manage own profile
- Cannot manage org
Best practice
- Multiple owners: Have at least 2 owners in case one is unavailable
- Admin for team leaders: Promote team leaders to admins for better management
- Member by default: Keep most users as members for security reasons
Calendar and resource management (Owners And Administrators)
Organization owners And Administrators has access to powerful filtering option reviewing through calendar and resources.
Calendar Filtering
When you navigate to the Calendars or Resources pages, you'll see filter options at the top, allowing you to toggle between:
My Calendars / My Resources
Shows only calendar Or resources, which You manage. This the default view to focus on your own items.
All Calendars / All Resources
Shows calendars or resources from all active members in your organization. Use this to get organization resource overview.
Statistics Update: When filtering calendars, Statistics (Total calendars, Total events, Avg. events/calendar) automatically update to reflect your selected filter.
Note: Regular Members (Non-Administrators) see these filters. They see only their calendars and resources that have been shared with them.
User invitation To your organization
Organization owners And Administrators can invite new users login to organization. Invitation System leads new users via simplified registration process with ahead filled information and automatic organization membership without assignment after email confirmation.
Quick action: To invite a member, go to your organization dashboard and click the button "Invite member". Enter their email address and optional message.
How works invitation Process
Invitation sent from that
Administrator or Owner sends an invitation by entering the recipient's email address. System generates a unique invitation link and sends it via email.
User clicks invitation link
When the receiver clicks invitation link, they automatically redirected To Registration page with ahead fill you and lock you email address.
Is ahead filled: Email Address (only skaitymui)
Auto-selected: Registration card
Message displayed: "Register to accept invitation to [Organization Name]"
User creates account
User fills registration form. Their Email already filled, so they only need to provide:
- Name Last name
- Password (minimum 8 simboliai)
- Confirm password
- Accept terms and privacy policies
- Complete CAPTCHA verification
Email verification required
After registration you will receive a confirmation email. Click the link to activate your account and start using CalDAV.
Automatic join to organization
When user confirms email address, system automatically:
- deactivate user account
- Processes pending invitation
- Adds user to organization as Member
- Grants access to organization resources
Important notes
Email prefilled and locked
Email address from the invitation automatically fills the registration form and cannot be changed. This ensures that the invitation is accepted by the correct person.
Email Username
System use modern an authenticator way, when your email address serves how your username. Registration you not separate user name field.
Invitation Expiration
Invitation links expire after certain time period. if User tries use expired link, they will see Errors notification and you must contact with administrator due to new invitation.
Security features
Invitations use secure tokens, registration you required CAPTCHA verification, o email verification apsaugo From noleistino account creation.
Troubleshooting Deletion
Click invitation link, but it says "Invalid or Expired invitation"
This can happen if:
- Invitation is invalid (check when it was sent)
- Invitation has already been accepted
- Invitation was cancelled by administrator
Solution: Contact your organization administrator sent a new invitation.
Registered, but didn't receive confirmation email
- Check your spam/unwanted mail folder
- Wait a few minutes - email delivery can take time
- Check, or you led correct email address
- Contact support@servera.lt if the problem persists
Can I use a different email address than the one in the invitation?
No, the email address locked and cannot be changed during the invitation registration process. This ensures the invitation sent to the correct person.
if you need to use different email address, Ask organization administrator send new invitation To norima email address.
I confirmed your email, but dar not in organization
Organization membership is added automatically after email confirmation. If you don't see your organization:
- Try log out and again login
- Clear browser cache and cookies
- Contact organization administrator to verify the invitation status
user Guide
Creating events
Create events from any connected calendar client:
- Click "new Event" your calendar client
- Enter event name, date and time
- Add location and description
- Invite attendees by email
- set up reminders
- Save event
Calendar Sharing
Share your calendar with colleagues:
- Right-click on your calendar
- Select "Share calendar" Or "Properties"
- Add users Or groups with appropriate permissions
- Recipients Now can access your calendar
subscription shared calendar
Access with you sharing calendar:
- Shared calendars automatically appear in your calendar list
- You can them Show/Hide by requirement
- Color coding for different calendars for easy recognition
Web Calendar View
Review your calendars and events thosesiai your browserje with our with beautiful interactivea calendar Interface.
Accessing calendar view
- Go To Calendar page admin panel
- Find calendar, you want to want Review, table
- Click button "Review" (shared/read-only calendars) Or "Edit", then view mode
- Calendar opens in beautiful month view with all events displayed
Calendar view features
See all month events clean grid from layout
Navigate between months with Previous/next buttons or jump to Today
Click but you want to event, that you view all details, including place, description and time
Events displayed with orange gradient cards lengvam recognition
with you shared Calendars shows orange "shared" badge
See total current month events count at a glance
Pro Tip: Use web calendar view quickly review Your schedule, o then use CalDAV client events Create And Edit.
Likti prisijungus with ""Remember me""
Function ""Remember me"" allows likti prisijungus prie CalDAV web interface until 30 days, not and closing browser.
Convenient: Check ""Remember me"" checkbox when logging in, that to avoid password entering every time visiting admin panel.
How it works
- When log in with mark you ""Remember me"", Secure Authorization stored your device
- This Authorization automatically you connects you back, when return To website
- Authorization valid for 30 days from last login
- You can likti logged in until 5 devices one you
- Logout removes authorization from the device
Security features
- Secure Repository: Authorization encrypted and securely stored
- Device tracking: Each device gets unique authorization
- Automatic expiration: Authorization automatically expires after 30 days
- Proper logout: Atsijungus visiškai pašalinama autorizacija
Important: Use "Remember me" only on your personal devices. On shared or public computers, always log out manually and do not check this option.
Profile management
Access Your profile page address HTTPS://caldav.lt/profile, that you managed Your account settings, security and you view activity logs.
Profile skyriai
Atnaushenkite your profile information, time themta and kontaktinius details
change password, Enable/Disable 2FA, Control backup codes
Review all login attempts, successful And Failed, with device information
Review all emails, which you fromsiunte System (reminders, warnings through and etc.)
Configure, which email notifications want Fetch
Explore your details Or Permanently delete your account
Login History
Monitor your account security by reviewing all login attempts. Login History shows:
- Date And Time: When tovyko Login (Europe formyou)
- Status: Successful, 2FA Required, or Failed (with reason)
- IP Address: Is where tovyko Login, including miesta and remove
- Device information: usesma Browser and othroughacino System
Security Tip: Regularly check Your login history for Withspicious activity. if see logins is unfamiliar locations whether devices, Immediately change password and enable 2FA.
Email Log
Review all system you sent emails history. Email log in your your profile shows all system emails with search filter by type.
Available email types
Password recovery requests
After registration you will receive a confirmation email. Click the link to activate your account and start using CalDAV.
Security Notifications due to Failed login attempts
Calendar event notifications
Upcoming event reminder emails
Calendar sharing notifications
Invitations to join organization
2FA backup code usage alerts
Welcome message for new users
share System messages
General reminder emails
Email configuration test notifications
Miscellaneous system emails
Tip: Use search filter to quickly find specific email types. Each email shows sender information, subject, date/time and delivery status (sent/failed).
Account Deletion (Protected by 2FA)
If you need to permanently delete your account, you can do so from the Privacy and date tab in your profile.
Security security: If you have two-factor authentication enabled, you will need to enter your 2FA code (or backup code) in addition to your password when deleting your account. This protects against unauthorized account deletion.
Account deletion irreversible and will remove:
- Your profile information
- All your calendars and events
- All shared calendar permissions
- All stored preferences and settings
Email Notifications
CalDAV informs you about important calendar events and activity via automatic email notifications. You will receive emails for event reminders, calendar sharing updates and other important notifications.
Event reminders
never miss an important meeting or appointment! CalDAV automatically sends you email reminders about upcoming events based on alarm settings you configure in your calendar client. Works with ALL devices including iPhone, iPad, Android, Mac, Windows and Linux!
✨ Now Wholly adjustable with iPhone and mobile devicess!
Our with email reminder System was enhanced, that smoothly work with with all calendar clients:
- iPhone and iPad: Works automatically - not require any special setup!
- Android: Full support via DAVx⁵ and native apps
- Desktop clients: Thunderbird, Apple Calendar, Outlook and etc.
- Lightning fast: Reminders checked every 15 seconds for immediate delivery
- Professional emails: Items badge Design with modern until stiliumi
How event reminders work
- 1. Create event your calendar client (iPhone, Android, Thunderbird, Mac Calendar and etc.)
- 2. Set up reminder/alarm event (e.g., 5 minutes, 15 minutes, 1 hour, 1 day before)
- 3. Save event - it will automatically be synchronized CalDAV server
- 4. get email notification for reminder times - delivered via within seconds with ±1 seconds accuracy!
Setting up reminders in your calendar client
Mozilla Thunderbird
- create Or edit event
- Find "Priminimo" distributed from list
- Select, When want be priminti (15 min, 30 min, 1 val., 1 Day, selectnai)
- Save event
iPhone / iPad / Mac Calendar
- create Or edit event
- Tap/Click "Warning" Or "Aliarmas"
- Select, When want be priminti (5 min, 15 min, 30 min, 1 val. and etc.)
- Save event
- ✓ Gausite email automatically!
Note: not require Select "Email" type - all alarms trigger email reminders!
Google Calendar (via CalDAV)
- create Or edit event
- Click "Add notification"
- Select "Email" how notification type
- Select reminder time
- Save event
Android Calendar
- Open calendar app (after to, when set DAVx⁵)
- create Or edit event
- Tap "Add notification"
- Select reminder time
- Save event
What's included in reminder emails
Professional branded emails with orange gradient header and with all event details:
Pro Tip: Set up multiple reminders imsupportantems events! for example, set reminders 1 day before (available) And 15 minutes before (tosiyountilnti, that will be times).
Common reminder times
System Performance - Production Ready!
- Ultra Fast Scheduling: Checked every 15 seconds (4 times per minute)
- Exact delivery: ±1 seconds accuracy for reminder times
- Scalable architecture: Queue-based system with 5 concurrent workers
- Reliable delivery: Automatic retry on failure with exponential backoff
- Prevents duplicates: Each reminder sent only once
- Laiko Synchronization: server Time Synchronized with NTP tikslumui
Event reminders shareems kalendoriams
NEW FEATURE: When a calendar is shared with a group, all group members automatically receive event reminder emails!
Who receives reminders?
- ✓ Event owner: The person who created the event
- ✓ Direct share recipients: Users with whom the calendar is directly shared
- ✓ Groups Members: All group, your access to calendar, Members
Permission Requirements
Users must have at least READ permission to the calendar to receive event reminders. This ensures that only authorized team members are notified about events.
Sample scenario
Scenario: User1 creates "Team calendar" And share jto with "Marketingo team" group.
Group members: User2, User3 and User4 are all in Marketing team group.
User1 creates event "Team meeting" with 15 minutes reminder.
Result: All 4 users (User1, User2, User3, User4) receive the reminder email 15 minutes before the meeting!
Note: System automatically tracks group members and calendar sharing permissions. No additional configuration needed - it just works!
Note: Email reminders are sent in addition to any device notifications shown in your calendar client. This ensures that you never miss important events, even if your phone is disabled or disconnected. Check spam folder if you do not receive reminder emails.
Calendar sharing notifications
When someone shares a calendar with you, you will receive an automatic email notification informing you about the new calendar access and what permissions you have.
When you will receive sharing notifications
- Someone grants you access to their calendar
- You have been added to a group with calendar access
- Your permissions calendar replace
What's included in sharing emails
Understanding Your Permissions
You can Review all events, but cannot their Add or change
You can Create, change And Delete events this calendar
You can see when a person is busy, but not event details
Access to shared calendars
After receiving a sharing notification, the shared calendar will automatically appear in your calendar client the next time it synchronizes. No need to add it manually!
Automatic Synchronization
- Receive sharing notification email
- Open your calendar client (Thunderbird, Apple Calendar and etc.)
- Wait automatic synchronization (Or force manual synchronization)
- Shared calendar appears in your calendar list
- Start Review Or Edit (by your permissions)
Pro Tip: Color shared calendars differently from personal calendars so you can easily distinguish them at a glance!
Others email Notifications
In addition to event reminders and calendar sharing, you can receive other important emails:
Invitation to join organization
When an administrator invites you to join their organization, you'll receive a welcome email with a secure link to complete registration.
Email verification
After registration you will receive a confirmation email. Click the link to activate your account and start using CalDAV.
Password reset
if you forgot your password, Ask reset and you will receive email with secure link, that where you can set a new password.
Security Notifications
Important security Warnings About your account, for example, Login from new device or suspicious Activity (when Enabled).
Email Delivery Tips
- Check spam folder: Sometimes emails may be filtered as spam by your email provider
- Add To contacts: Add caldav@servera.lt To your contacts, that you ensured delivery
- Include domain to whitelist: Ask your IT team to whitelist emails from servera.lt to whitelist
- Check email address: ensure, that your email address CalDAV profile nustatymuose yra Correct
Organization scheduled email delivery
Your organization can configure a custom SMTP server to send emails from your own domain instead of the default CalDAV email address. This improves email deliverability and brand consistency.
Custom SMTP benefits
- Better deliverability: Emails from your domain are less likely to be marked as spam
- Brand consistency: Notifications sent from your organization's email address
- Trust: Recipients recognize emails from your domain
- Control: Use existing email infrastructure and policies
Example: Instead of emails receiving from caldav@servera.lt, your Users can Fetch notifications from calendar@yourcompany.com
Note: This feature must be configured by your organization Owner or Administrator. Contact administrator, if you want your organization to use custom email delivery.
SMTP configuration test (administrators)
Configuring custom SMTP settings, organization owners And Administrators can Send test el. emails, that verified, whether Configuration works correctly.
Modern default: When you click "Send trial email", the email address is automatically set to info@yourdomain.com (using your SMTP domain), making the test fast and convenient.
You can still enter but you want to email address, To you want to want Send test.
Two-Factor Authentication (2FA)
Two-Factor Authentication (2FA) adds an extra layer of security to your account by requiring a verification code from your mobile device along with your password when logging in. This protects your account even if your password compromised.
Why use 2FA?
- Enhanced Security: Protects from password theft and phishing attacks
- Device Verification: Only devices with your authenticator app can log in
- Peace of mind: Know that your calendar data secure
- Backup Access: Use backup codes if you lose your device
Setting Up Two-Factor Authentication
Complete these steps to connect 2FA to your account. You will need a modern phone with an installed authenticator application.
Recommended authenticator apps
setup Process
Install authenticator app
Download and install one of the recommended authenticator apps from your device app store (Google Play or Apple App Store).
Log in to your account
Go to your profile page and log in with your email and password.
Go to security settings
Click tab "Security" profile settings.
Click "Enable two-factor authentication"
Find 2FA section and click the button "Enable two-factor authentication".
Scan QR code
A QR Code will appear on your screen. Open your authenticator app and:
- Tap "+" Or "Add" button in your authenticator app
- Select "Scan QR code" Or "Scan barcode"
- point your phone camera at the QR code on screen
- Account will be added automatically
Enter confirmation code
Your authenticator app will now show a 6-digit code that changes every 30 seconds. Enter this code in the confirmation field and click "Confirm And Enable".
Save backup codes
When you enable 2FA, you will be provided with 10 backup codes. These are one-time codes that you can use if you lose access to your authentication app.
Login with Two-Factor Authentication
When 2FA enabled, the login process includes an additional step for identity verification.
Login Process with 2FA
-
1
Enter email address and password Enter your email and password as usual on the login page
-
2
Complete CAPTCHA verification Complete the CAPTCHA verification
-
3
Open authenticator app Open your authenticator app and find the 6-digit code for CalDAV Calendar
-
4
Enter 6 digit code Enter the 6-digit code in the 2FA field that appears
-
5
Click "Login" Click "Sign In" to complete the login
Time-Sensitive: The 6-digit code changes every 30 seconds. be sure to enter it before it expires!
Lost your device?
If you do not have access to your authenticator app, you can use one of your backup codes instead of the 6-digit code. Enter the backup code in format XXXX-XXXX.
Backup Codes
Backup codes are one-time codes that allow you to access your account if you lose your phone or cannot access your authenticator app.
What you need to know
- When you enable 2FA you will receive 10 backup codes
- Each code can be used only once
- Format:
XXXX-XXXX - Use them like a regular 2FA code during login
Important security tips
- Store backup codes in a safe place
- Do not share them with anyone
- Keep them offline (printed or in password manager)
- Regenerate if depleted or suspected compromise
Using backup codes
- Log in with your email and password
- When prompted for 2FA code, enter a backup code instead
- Use format XXXX-XXXX (with or without dash)
- Click "Login"
Regenerating backup codes
If you've used most of your backup codes or want to generate new ones for security reasons:
- Go to Profile → Security page
- Click "Regenerate backup codes"
- Enter your password for confirmation
- Save the new set of 10 backup codes
Warning: Regenerating backup codes will invalidate all previous codes. Make sure you update your stored backup codes!
Disabling Two-Factor Authentication
If you need to disable 2FA (not recommended unless necessary):
- Go To Profile → Security
- Find the two-factor authentication section
- Click "Disable 2FA"
- Enter your password for confirmation
- Click "Disable 2FA" in the confirmation dialog
Security Notice: Disabling 2FA reduces your account security. Your account will be protected only by password, making it vulnerable to password theft or phishing attacks.
2FA Troubleshooting
Verification code not working
Try these solutions:
- Check that your phonce set to automatic (network-provided time)
- Make sure you enter the latest code (they change every 30 seconds)
- Check that you are using the correct account in your authenticator app
- Try using a backup code instead
Lost phone with authenticator app
You have two options:
- Enter one of your saved backup codes to log in
- If you don't have backup codes, email support@servera.lt with your account details for assistance
Got new phone - how to transfer 2FA?
To transfer 2FA to a new device:
- Log in to your account using your old phone's authenticator or a backup code
- Go to Profile → Security
- Disable 2FA (you'll need your password)
- Install the authenticator app on your new phone
- Re-enable 2FA and scan the new QR code with your new phone
- Save the new set of backup codes
Code expires too quickly
TOTP codes (Time-based Ono-Time Password) change every 30 seconds by design. This a security feature. To avoid timeout issues:
- Have your authenticator app ready before starting the login process
- Wait for a fresh code (one that just appeared) before entering it
- Type the code quickly or copy-paste it if your app supports it
Backup codes expired
You can regenerate new backup codes:
- Log in to your account (using your authenticator app)
- Go to Profile → Security
- Click "Regenerate Backup Codes"
- Enter your password to confirm
- Save the new set of 10 backup codes securely
Important: Old backup codes will no longer work after regeneration.
Best 2FA practices
- Save backup codes immediately when you enable 2FA
- Store backup codes securely - use a password manager or print them and keep in a safe place
- Keep your phonce synchronized with automatic/network time
- Use a trusted authenticator app from a reliable provider
- Regenerate backup codes if you suspect they may be compromised
- Don't disable 2FA unless absolutely necessary
Troubleshooting
Cannot Connoct to Server
- Verify the server URL correct
- Check your username and password
- Ensure you have internet connectivity
- Try using full CalDAV path:
HTTPS://caldav.lt/caldav/[user_name]/
Events Not Syncing
- Force a manual sync in your calendar client
- Check your internet connection
- Verify the calendar not set to read-only
- Remove and re-add the account
SSL Certificate Errors
- Ensure you're using HTTPS in the server URL
- Check your device's date and time are correct
- Update your calendar client to the latest version
Frequently Asked Questions
Everything you need to know about CalDAV Calendar